
Juki MCS-1500 Coverstitch Review – Improve Your Prowess in a Flash
The Sewing Machine We’ve All Been Looking For
How many times did you try to hem the jeans, sleeve cuffs, or hem the necklines on your old basic sewing machine and failed?
Like, miserably failed. Failed that much that you just want to give up before you lost all your nerves and destroy all you just created.
Well, I have a solution for you!
It is called a coverstitch machine or a serger. The main purpose of this sewing machine is to sew up your edges with 3, 4, or even 5 threads and make them secure, neat, and more professional looking.
You can use it on different types of fabrics,and it will improve your skills significantly and save you a great deal of time and nerves. So, after I learned all this, I decided to purchase a serger machine for myself.
Just in case you decided to look more into this topic, I highly recommend you read my Best Serger Sewing Machine review and discover all the possibilities.
I choose to work with Juki MCS-1500 because of all the good feeds I have heard over the years about products that come from this company.
Furthermore, a ton of great reviews I got from my fellow sewers about this exact model was another reason to test it out.
So, can you please do me (and yourself) a favor and read my review and find out why you should buy this machine and put an end to your sewing troubles once and for all.
Quality Table
I spent a lot of time using and researching this machine to find the best possible way to use it. So, catch a glimpse of my overall impressions in this quick grade chart here:
But after you saw these grades I bet you are interested in finding out more about this amazing machine so, please continue to read this article to the end, and you will be surprised with how good this machine really is.
Coherent Review – My Detailed Revision
First, let’s resolve one thing – this is not a regular sewing machine; this is a specialized sewing machine that will come in handy to anyone who sews on more than intermediate level. So in this review, I will try my best to explain to you how this machine works.
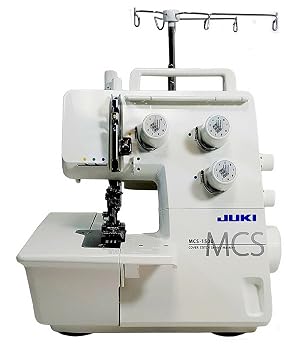
External Appearance
Well, you don’t need to look twice at this machine to figure out that this is not one of those basic sewing machines. This model is ideal for creating both chain and thread cover stitches. If you already had a chance to read my Best Coverstitch Machines review, you approximately have an idea of what kind of machine I am talking about here.
You will not need to make a lot of working space for this machine because the dimensions are quite modest; with just 11 x 13 x 11.25 inches (27.9 x 33 x 28.5 cm), you can put it almost anywhere.
And with a built-in carrying handle, transporting the weight of this machine 15.5 lbs (7 kg) is a piece of cake.
This model comes with a removable looper cover and cloth plate. On the looper cover, you will find threading diagram that is see through so you can easily check on your thread when there is a need for that.
When you open the cloth plate inside you will find looper auto-threader and looper thread tension dial, and I will explain them better later in this article.
Juki MCS-1500 offers you four and three thread cover stitches, so that means you need to use three needles at the same time. So, right above the looper cover, you will find three different needle thread tension dials – left, center, and right.
To be able to thread the machine with multiple threads you will find two spool holders built-in the back of the machine and two additional ones that you need to attach just under the built-in spool holders.
Okay, now it’s time to explain to you where those threads go. On top of the machine behind the carrying handle, you will find a retractable support rod that has the purpose of holding the thread guide.
The handwheel is located on the side of the machine, and it will help you to move your needles in wanted position. Above the handwheel, you will find two dials: stitch length dial and differential feed dial (DIF).
When you want to raise the presser foot you will need to use the presser foot lift switch but here is the trick – it is not located on the presser foot holder like with the regular sewing machines. Here the switch is located on the sewing machine arm, just above your workspace.
While we still talk about presser foot, you can adjust presser foot pressure on the dial that is located on the top of your machine next to carrying handle.
Juki MCS-1500 comes with sewing light above the sewing plate to make monitoring your seams easier. Let’s not forget that this machine is equipped with a thread cutter and a soft cover to allow you to protect your machine from dust.
How to Operate This Machine
I know it might seem like it is hard to work with this machine but believe me that’s a wrong impression. It’s straightforward, and if you have any troubles with handling it, you can always download and read these instructions.
To learn how you can prepare and use the machine, watch this official tutorial:
So let’s start with some basics. Whatever you want to do, change, replace or remove from the machine please always make sure that you first unplug your machine from the wall socket and turn the power switch to off to prevent damaging your machine.
Let’s talk about the needles. As I already said, this machine works with three needle types – 130/705H and size 70-90. But don’t worry, changing the needle is not complicated or different than on any other machine. Just follow these steps:
- Switch the machine off.
- Crank the handwheel to raise the needles.
- Next step is to lower the presser foot.
- Now loosen up the needle set screws with a hexagonal screwdriver that you got in the accessories bag.
- Remove the set of needles.
- Always place the flat side of the needle towards the hole of the needle inserter.
- Insert your needle set into the needle clamp and tighten the needle set screws.
When threading this machine always make sure you first thread the loop, and then needles. To do this follow my lead:
- Switch the machine off.
- Fully raise the support rod and attach the thread guide.
- After this, open the cloth plate and loop cover.
- Crank the handwheel until you see that the loop reached the leftmost position.
- Lift the presser foot to release the tensions.
To see how to thread this machine properly watch this official tutorial:
This machine comes with two different kinds of presser feet: the coverstitch presser foot and the chain stitch presser foot. It is very easy to alternate between them. If you want to learn how to do it, read the next few lines:
- Switch the machine off.
- Crank the handwheel to raise the needles.
- Raise the presser foot and release it by pressing the little lever on the presser foot back.
- Raise the high shank presser foot holder into its highest position and slide it to the left to completely remove it.
- Now to attach the new foot, you need to place it under the high shank presser foot holder to be in the same line with the presser foot pin.
- When you lower the foot holder, the foot will be automatically attached.
After you thread your machine before you start sewing make a quick sewing test to be sure you thread all parts correctly.
The best way to do it is to plug the machine back on, set tension form 3 to 5 and stitch length to 3, set DIF to N, place the fabric under the presser foot and the first stitch sew up by hand cranking the handwheel. After this procedure, you may continue to sew regularly, and your sewing test is done. If all is threaded well your stitches will be neat and strong.
You can watch sew test on this official tutorial:
Features That Call for Attention
This model comes with a lot of practical features. And I don’t know where to start.
Let’s start with this incredible feature; this machine comes with a sewing speed of 1350 stitches per minute! That is just slightly faster than the speed range of a Brother 1034D Overlocker.
I mentioned earlier the loop auto-threader; all you need to do is to slide the thread into the slot and lower the looper slowly back to its place.
You will use differential feed dial (DIF) when you want to adjust the feed dogs. Two different feeding dogs move the front one individually and back one.
The purpose of these feed dogs is to prevent fluting and waving of knitting and stretch fabrics and prevent puckered seams on materials like nylon. DIF can be adjusted in four different variables: 2, 1.5, N, and 0.7, and they work differently on both cover and chain stitches.
The presser foot has an extra-high position to allow you to work on thicker fabrics. A great feature is that you can adjust the presser foot pressure to fit your needs. To change it, you only need to turn the dial to some of the three options you are offered:
- M– the normal pressure.
- H– the high pressure used for thick fabrics and elastic sewing fabrics.
- L– less pressure for light fabrics and soft knits.
Also, the presser foot is equipped with a guide that presses down on both sides of the foot, helping you to create those perfectly straight stitches finally.
You can also adjust your stitches. The width can be in the range from 2.5 mm to 5 mm, and the length goes between 1 and 4 mm. But let me give you advice here for cover stitches use 3 mm length and for chain stitch 2.5 mm length.
You will find out that on every spool holder there is a thing called anti-vibration cone.
So when you use a regular size of the spool, place the cone with the wider side at the bottom, but when you need to use the industrial spool place the spool opposite with the wider side at the top.
For household spools, always remove the anti-vibration cone.
If you are having trouble with thread that slips and twists you can always cover them with thread nets that you will get in the accessories bag.
The extension plate on this model is equipped with the seam guidelines to also help you with creating straight, neat, and clean stitches.
All those features and functions that I mentioned here are the reason why this machine has a higher price. This is the only thing about this model that I can sort as a disadvantage.
Accessorizing Your Machine
This model comes with some standard accessories like:
- Needle set
- Hexagonal screwdriver
- Thread nets
- Needles inserter
- Spool caps
- Electronic foot control
- Chain stitch and coverstitch presser foot
- Softcover
But there are a few optional accessories that you can purchase on Juki official site; those are tapping foot, coverstitch hem guide, and chain stitch presser foot.
Long Story of Juki Coverstitch 1500 Short
Pros
- Sewing speed is 1350 spm
- Equipped with three needles
- Easy loop threading
- DIF adjustments
- Adjustable stitch length and width
- Extension plate with seam guidelines
Cons
- High price
An Outcome
Juki MCS-1500 is an impressive machine that will come as a valuable extension for anyone who works as a professional sewist or have the ambition to become one.
With this machine, you will surely be more effective and efficient, and all your clothes will get the finishing touch they deserve. It might be too pricey for your pocket now, but just remember how much time it will save you.
So if this review even slightly interested you in taking some time and research this model or any other that is similar to this, I will consider my mission successful.